Some scopes seem easy to get behind. Bring the rifle into a natural position and the full image appears almost immediately. Others are less forgiving: move your head slightly and a black crescent creeps in from one side, or the picture shrinks into a dark ring.
That difference is often described as the eyebox.
Eyebox is useful language, but it is not usually a single measurement printed beside length and weight. It describes the usable three-dimensional space behind the eyepiece where your eye can still see the intended field of view. A more forgiving eyebox gives you some freedom to move forward, backward or slightly off-centre without losing the picture.
Before checking the view through a mounted optic, make sure the firearm is unloaded, keep it pointed in a safe direction and follow local laws and safe-range procedures. Never look at the sun or another intense light source through a scope.
The short answer
- Eye relief is the nominal distance from the rear lens to the eye where the full image is available.
- Exit pupil is the small beam of light leaving the eyepiece.
- Eyebox is the usable area in which your pupil can move while still receiving a satisfactory image.
These ideas are related, but they are not interchangeable. A scope can list adequate eye relief and still feel demanding if the usable position around that distance is small. Two scopes with similar paper specifications may therefore feel different when you shoulder them.
Why the eyebox is not one fixed number
Eye relief can be reported in millimetres or inches. Eyebox is harder to reduce to one figure because it has length, width and height, and because the acceptable view depends on more than geometry alone.
Optical design, magnification, effective objective diameter, exit pupil, field of view and image correction away from the optical centre all contribute. The shooter's pupil size and the standard used to decide what counts as a “full” or “clear” view matter too.
This is why broad claims such as “large eyebox” or “forgiving eyebox” should be treated as descriptions rather than universal measurements. They can be meaningful, but they do not create a standard comparison unless the manufacturer explains how the value was tested.
What black edges are telling you
A black ring normally appears when the eye is too close to or too far from the scope's usable eye-relief position. Move closer or farther away and the visible image should expand when you reach the correct zone.
A dark crescent on only one side usually points to lateral or vertical misalignment. Your eye is no longer centred behind the exit pupil, so part of the light cone misses the pupil. Moving the head toward the clear side normally restores the image.
If the image repeatedly disappears when you settle into a comfortable shooting position, the problem may not be the optic. The scope may be mounted too far forward, too far back or too high for the stock and the way you hold the rifle.
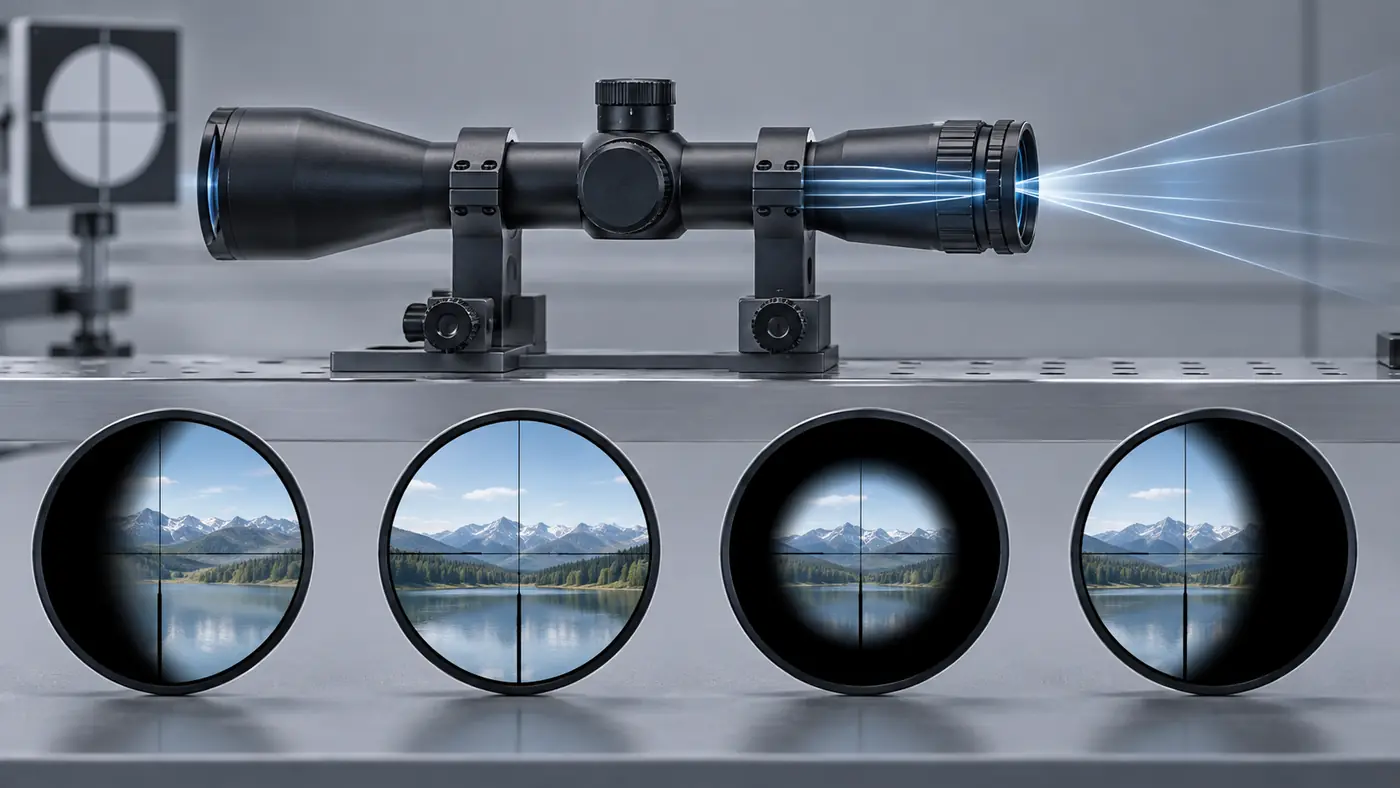
A full image appears when the eye is in the usable zone. Moving too far forward, backward or sideways introduces a ring or crescent of shadow.
Our eye-relief guide looks more closely at these black-edge patterns and the forward-and-backward position of the eye.
Eye relief and eyebox are related—but not identical
Eye relief answers a distance question: how far behind the eyepiece should the eye be? Eyebox adds tolerance around that position.
Imagine that a scope provides its best view with the eye roughly 90 mm behind the eyepiece. That figure does not tell you how far the eye may move forward or backward before the field starts to darken. It also says nothing about how much side-to-side movement the design permits.
This distinction matters during mounting. Setting the scope at the nominal eye-relief distance is only a starting point. The final position should work with your normal cheek weld, shooting posture, clothing and the highest magnification you realistically expect to use.
For safety, leave enough clearance for recoil and follow the scope maker's mounting instructions. Do not move the scope dangerously close to the face just to make the image look larger.
Exit pupil helps explain lateral tolerance
Exit pupil is approximately the effective objective diameter divided by magnification. A 40 mm effective aperture at 10× produces a nominal 4 mm exit pupil; at 5×, it would be about 8 mm.
When the exit pupil is comfortably larger than your eye's pupil, there is more room for the eye to move while still receiving the available beam. As magnification rises, the exit pupil normally shrinks, so small alignment errors become easier to notice.
This does not mean exit-pupil diameter is a complete eyebox score. Field of view, eye relief and correction away from the optical centre still matter. It does explain why a scope can feel relaxed at low power and more particular at the top of its zoom range.
For the underlying calculation, see our exit-pupil guide. The recent objective-size comparison also shows why objective diameter only makes sense when considered with magnification.
Why high magnification often feels less forgiving
At higher magnification, the exit pupil is generally smaller and the field of view narrower. A slight change in head position can therefore produce visible shadow sooner, while movement in the image appears more pronounced.
Variable-power scopes may also change eye relief slightly across their zoom range. The amount and direction depend on the design, so a model-specific manual is more useful than a universal assumption.
This is why final eye-relief setup is commonly checked at maximum magnification. If the full image remains available from a natural position at the most demanding end of the range, lower settings are less likely to force an awkward head movement. Our magnification guide explains why usable power matters more than the largest number on the ring.
A large objective does not guarantee a generous eyebox
A larger objective can support a larger exit pupil at the same magnification, but that alone does not prove the scope will have a more forgiving eyebox.
The effective aperture may vary through the zoom range, and the rest of the optical design still decides how the image behaves away from the ideal eye position. A 56 mm scope is not automatically easier to use than a well-designed 40 mm scope. It may also require taller rings, which can make a consistent cheek position harder if the stock does not match the new sight height.
Treat objective size as one part of the system rather than an eyebox rating.
Mounting position can make a good scope feel difficult
Even a forgiving optical design will feel wrong when the scope is positioned for someone else's posture.
Use the shooting position you expect to use most often. Shoulder the unloaded rifle naturally, settle your head without stretching, and then check whether the full image appears. Repeat the check at the highest intended magnification and from any other position that matters, such as prone or a supported bench.
If you must crawl the stock, lift your cheek or pull your head back every time, adjust the scope position before blaming the eyebox. Ring height matters as well: a scope mounted unnecessarily high may leave your eye above the optical axis even when the forward-and-backward distance is correct.
Our scope ring-height guide covers objective clearance, sight height and cheek position as one setup problem.
A simple way to diagnose the view
Start from a safe, stable position with the scope at moderate magnification.
- Find a full circular image. Move slowly forward and backward until the dark outer ring is smallest.
- Check the edges. Move slightly left, right, up and down. A one-sided crescent shows which way the eye has left the optical axis.
- Return to a natural cheek position. If the picture disappears when you relax, the mounting position or stock fit needs attention.
- Increase magnification. Repeat the test at the highest setting you expect to use. Do not assume a setup that works at low power will feel identical at high power.
- Separate focus from position. If the full circle is visible but the reticle is soft, adjust the diopter. If the reticle appears to move against the target when your eye shifts, check parallax rather than eye relief.
The field-of-view guide explains how much scene the optical system shows. Eyebox describes how precisely your eye must be positioned to receive that view; it does not make the underlying field wider.
What to look for when comparing scopes
Specifications remain useful, but they cannot replace looking through the optic.
- Check eye relief across the magnification range, not only at one setting.
- Bring the scope to the eye from a relaxed position instead of carefully hunting for the perfect spot first.
- Notice how quickly black crescents appear when the head moves slightly.
- Try the posture and eye protection you actually use.
- Consider whether the mounting range lets the scope sit where your natural cheek weld needs it.
- Keep safety clearance and recoil in mind throughout the comparison.
A forgiving eyebox does not make an optic universally better. A compact or high-magnification design may accept tighter eye-position demands in exchange for other priorities. The useful question is whether that trade-off suits the way you will use it.
The practical takeaway
Eyebox is the usable space behind the eyepiece, not another name for eye relief. Eye relief places your eye at the correct distance; exit pupil helps determine how much lateral tolerance is available; the complete optical design decides how usable the image remains around that ideal position.
When the view develops a dark ring or crescent, adjust eye position first. If a natural cheek weld cannot produce a full image—especially at high magnification—check scope placement and ring height. A good setup should bring the image to you without forcing your head into an awkward position.
For more plain-language optics explanations, browse our Buying Guides.

















Leave a comment