When the view through a scope does not look right, it is tempting to turn the nearest ring or dial until the picture improves. Sometimes that works. Just as often, it hides the real problem.
A blurry reticle, a soft target and a reticle that seems to move across the target are not the same thing. They involve three related ideas—diopter adjustment, target focus and parallax—and each needs a different check.
Before handling or looking through a mounted optic, make sure the firearm is unloaded, keep it pointed in a safe direction and follow the manufacturer’s instructions and local range rules. Never look at the sun or another intense light source through a scope.
The short version
- Diopter adjustment focuses the reticle for your eyesight.
- Target focus describes how sharp the target image appears.
- Parallax adjustment brings the target image into the reticle plane to reduce apparent reticle movement when your eye shifts.
On many scopes, the side-focus dial or adjustable objective influences both target sharpness and parallax. That overlap is why the terms get mixed together. The jobs are still different: a sharp-looking target does not automatically prove that parallax has been removed.
Start with the reticle: set the diopter
The diopter is normally at the rear of the scope, on or near the eyepiece. Its job is to make the reticle look crisp to your eye. It does not sight in the rifle, change the target distance or correct poor head position.
Look at a plain, light background so your eye is less tempted to focus on the scene. Glance through the scope briefly, then look away and let your eye relax. Turn the eyepiece in small steps until the reticle looks sharp as soon as you look through the scope.
Avoid staring through the optic while making this adjustment. The eye can compensate for a slightly wrong setting, making a soft reticle appear acceptable after a few seconds. Short glances make the result easier to judge.
Once the diopter suits your eyesight, it normally stays in that position unless another shooter uses the scope or your vision changes. Our diopter adjustment guide gives the full setup sequence.
Then check the target image
With the reticle clear, look at the target. If the scene is soft, a scope with side focus or an adjustable objective can usually bring the target image into better focus at that distance.
The distance markings on a parallax control are best treated as starting points, not laboratory measurements. Individual eyesight, atmospheric conditions and the scope’s optical design can all affect the exact position that works best. Turn the control until the target looks sharp, but do not stop there.
A fixed-parallax scope has no user control for this step. It is designed around a factory-set distance. At other distances—especially at higher magnification—the target may look less crisp and eye-position errors may become more noticeable.
Our guide to fixed and adjustable parallax explains why a “100-yard” setting is a design choice rather than a promise that every other distance will look unusable.
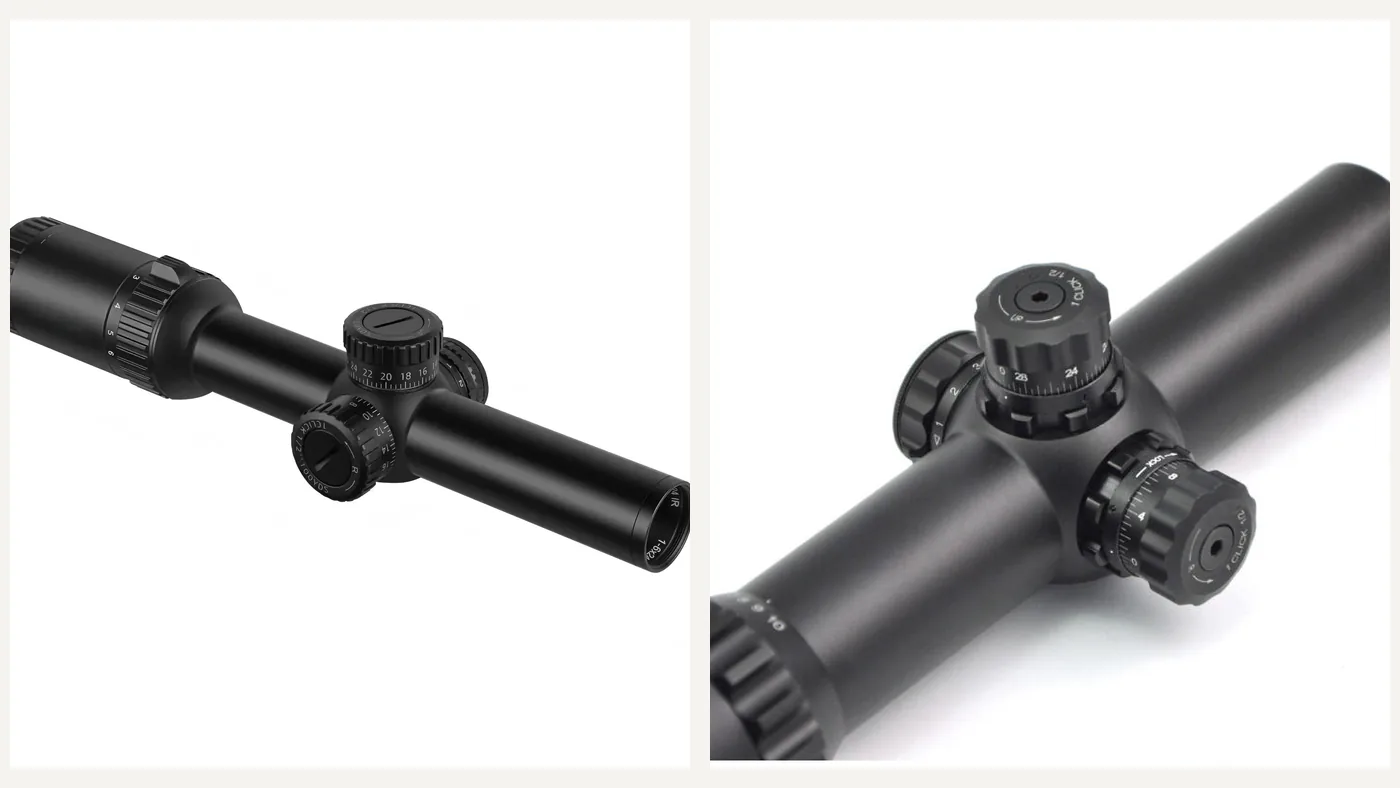
The eyepiece diopter and a side-focus or AO control may both change what looks sharp, but they solve different setup problems.
Sharp focus is not the whole parallax test
Parallax is about the relationship between the target image and the reticle inside the scope. If they are not in the same optical plane, moving your eye away from the optical centre can make the reticle appear to slide across the target even though the scope and target have not moved.
That apparent movement is the useful test.
With the unloaded firearm or scope held securely, aim at a small, clearly defined point. Without moving the scope, shift your eye slightly left, right, up and down. If the reticle seems to move against the target, fine-tune the side-focus dial or adjustable objective and repeat the check.
The goal is the smallest observable relative movement, not simply the sharpest-looking picture or the closest number printed on the dial. On a well-adjusted system, target sharpness and minimal parallax often occur near the same position, but they are not logically identical tests.
Why the side dial is often called “focus”
Manufacturers use several names: Side Focus, side parallax, parallax compensation and adjustable objective. The labels vary because turning the control often produces an obvious change in target sharpness while also moving the target image toward the reticle plane.
Calling it a focus dial is convenient, but it can lead to one bad habit: chasing a pretty image without checking reticle movement. For casual viewing, the sharpest image may feel like the end of the adjustment. For careful target work, the head-movement test matters too.
Also check what the third dial actually controls. On some scopes, the left-side housing combines parallax adjustment with reticle illumination. On others, it may be illumination only. The three-knob scope guide explains how to identify the controls before turning them.
Do not use the diopter to sharpen the target
If the target looks soft but the reticle is already crisp, leave the diopter alone. Turning the eyepiece to improve the scene can make the reticle wrong for your eyesight and force your eye to work harder.
Likewise, if the target is sharp but the reticle is fuzzy, the parallax control is not the first adjustment to make. Return to the diopter setup, use a plain background and judge the reticle with quick glances.
This sequence is the simplest way to avoid chasing two adjustments back and forth:
- Set the diopter for a crisp reticle.
- Aim at the target distance you intend to use.
- Adjust side focus or AO for target clarity.
- Move your eye slightly and fine-tune for minimum apparent reticle movement.
- Return to a natural, centred eye position before using the optic.
Where eye position fits in
Parallax adjustment does not make eye position irrelevant. A consistent cheek position still improves repeatability, and moving too far forward, backward or sideways can introduce a black ring or crescent even when the scope is correctly focused.
If the view darkens at the edge, check eye relief and lateral alignment before touching the focus controls. The eyebox guide explains how black edges differ from target blur and parallax movement.
This distinction is useful during diagnosis:
- Soft reticle: check the diopter.
- Soft target: check target distance, magnification and side focus or AO.
- Reticle appears to move when the eye moves: check parallax.
- Black ring or crescent: check eye relief, alignment and mounting position.
More than one issue can appear at the same time. Solve them in that order rather than trying to correct everything with one dial.
Magnification makes mistakes easier to see
At higher magnification, depth of field is generally less forgiving and small changes in eye position become more obvious. Target blur and parallax can therefore be easier to notice near the top of a scope’s zoom range.
That does not mean maximum magnification is always the best working setting. Use enough power to see what you need while keeping a stable view and a comfortable eye position. If you are still deciding how much power is useful, our beginner’s magnification guide provides a practical starting point.
A quick troubleshooting table
| What you see |
First thing to check |
What not to assume |
| Reticle is blurry against every background |
Diopter setting |
The target-focus dial will fix it |
| Target is soft but reticle is crisp |
Target distance, magnification, side focus or AO |
The diopter needs to be changed |
| Reticle shifts across the target as your eye moves |
Parallax setting |
A sharp image means parallax is gone |
| Black ring or one-sided shadow |
Eye relief and eye alignment |
Focus or parallax is the main cause |
| Only one shooter sees a soft reticle |
Diopter for that shooter’s eyesight |
The scope is necessarily defective |
The practical takeaway
Set the reticle first, then the target, then test for parallax. That order separates three jobs that are easy to confuse.
The diopter matches the reticle to your eyesight. Side focus or an adjustable objective helps place the target image correctly for the working distance. The final head-movement check tells you whether apparent reticle shift has been reduced. None of these adjustments replaces a natural, repeatable eye position.
For more plain-language explanations of scope setup and specifications, browse the USEEIN Buying Guides.

















Leave a comment