Illumination is supposed to make a reticle easier to see. Turn the control too far, though, and the opposite can happen: the aiming point looks swollen, the fine lines lose definition, and a dark target becomes harder to see behind the glow.
That does not necessarily mean the optic is faulty. In many cases, the brightness is simply too high for the light around you. The useful setting is rarely “as bright as possible.” It is the lowest setting that keeps the illuminated portion easy to find without hiding detail.
What illumination changes—and what it does not
An illuminated reticle adds contrast to part or all of the aiming pattern. Depending on the design, that may be a center dot, a horseshoe, a cross, or selected hold marks. Its job is to help the reticle stand out when the unlit lines would otherwise blend into the background.
Illumination does not make the target brighter. It does not improve light transmission through the scope, increase image resolution, correct focus, or remove parallax. Those are separate optical questions. If the whole view looks dim or hazy, turning up the reticle may only add a brighter mark to the same dim image.
For more on that distinction, see our rifle-scope light transmission guide.
Why an over-bright reticle looks worse
Your eye is looking at two things at once: the scene through the optic and the illuminated aiming mark laid over it. When the mark is much brighter than the scene, light can appear to spread around its edges. A fine center dot may look larger, a thin crosshair may look thicker, and small gaps in the reticle can become harder to distinguish.
This apparent flare is often called blooming. Manufacturers’ own troubleshooting guidance commonly starts with the same simple step: lower the illumination until the reticle stops overpowering the target.
Too much brightness can also work against dark adaptation. In low light, your eyes become more sensitive to faint detail. A strong red or green glow in the center of the view can pull your attention away from subtle contrast in the background. The reticle is visible, but the object behind it is not as easy to read.
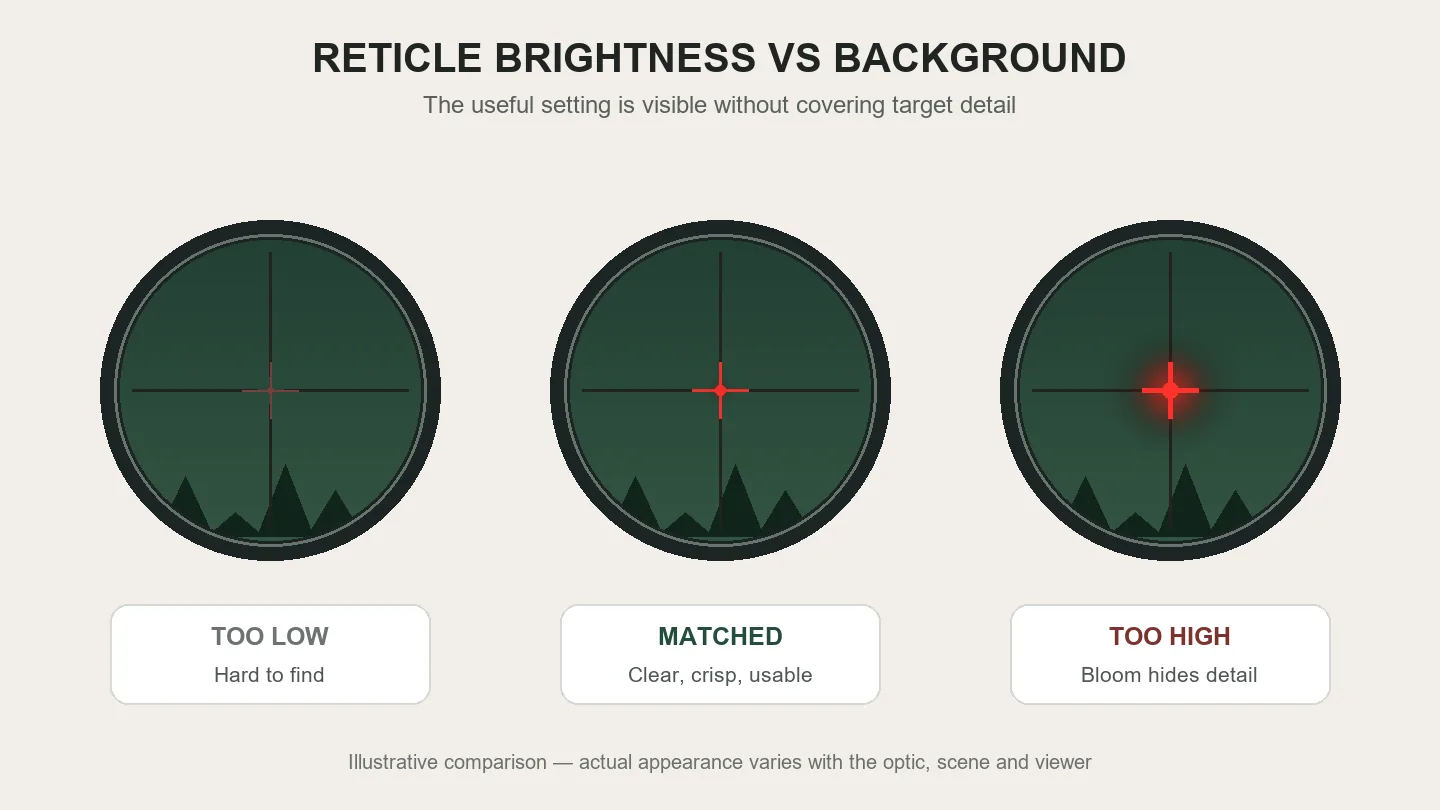
A low setting can disappear into the scene; a matched setting stays visible without covering detail; an excessive setting blooms around the aiming point.
Match the reticle to the background, not the number
Brightness numbers are control positions, not universal units. Level 4 on one optic may not resemble level 4 on another. Even on the same scope, the right setting changes with the background and ambient light.
A reticle that looks clean against a bright sky may be distracting against shaded trees. A setting that feels perfect at dusk may be too dim in midday sun. Indoor lighting can be misleading as well: a reticle adjusted in a dark room may look much stronger than expected outdoors.
Instead of choosing a favorite number and leaving it there, look through the optic at the actual scene. Raise the illumination only until the aiming point is easy to identify. If the glow starts covering texture or the edges look fuzzy, back it down one or two steps.
A simple five-step setup routine
1. Focus the reticle first
Set the diopter so the non-illuminated reticle appears sharp during brief glances. Illumination cannot fix an out-of-focus reticle. If the black lines are soft with the light off, address focus before judging brightness. Our diopter adjustment guide explains the sequence.
2. Start lower than you think
Begin with the illumination off or near its lowest visible setting. Look at the target, then increase the level one step at a time. Stop as soon as the illuminated area is easy to find without demanding your attention.
3. Check a light and a dark background
Move between two safe views—one brighter and one more shaded. The aim is not to find a setting that is perfect everywhere. It is to understand how quickly the apparent brightness changes so you can adjust before conditions shift.
4. Look at the target, not the glow
Keep your visual attention on the scene. If you find yourself staring at the reticle because it is the brightest object in the view, the setting is probably doing too much. A well-adjusted illuminated mark should be obvious without becoming the subject.
5. Recheck after your eyes adapt
A setting chosen immediately after stepping out of a bright area can feel too strong a few minutes later. Give your eyes time to settle, then make a final adjustment. This matters most around dawn, dusk, shaded woodland, and indoor ranges.
Daylight-bright and low-light illumination are different goals
Some optics are designed to produce a bold aiming point in bright daylight. Others use illumination mainly to add contrast in dim conditions. An illuminated reticle that is not conspicuous in direct sun is not automatically defective; it may still work exactly as intended at lower light levels, especially if the etched reticle remains visible without power.
This is one reason broad labels are not enough. Check the manual for the specific optic, including which parts of the reticle illuminate, how many settings it has, and whether any settings are intended for night-vision equipment rather than the unaided eye.
The underlying reticle design matters too. A fine center dot, a partially illuminated BDC pattern, and a bright horseshoe do not present the same visual load. Our reticle types guide and BDC reticle guide cover those differences in more detail.
When the reticle looks like a starburst
If an illuminated point looks like a star, comma, streak, or cluster, reduce the brightness before assuming something is damaged. High intensity can exaggerate flare, fingerprints, moisture, or small imperfections on a lens. Clean the exterior lenses correctly, confirm the diopter setting, and compare the view at several brightness levels.
It can also help to let another person look through the optic without telling them what shape you see. If the appearance changes between users or between your two eyes, vision may be part of the explanation. That observation is not a diagnosis, but it can prevent unnecessary adjustments or returns. Persistent distortion across different optics is a sensible reason to speak with an eye-care professional.
Lens cleanliness and glare control also affect how a bright reticle feels. See our lens coatings guide for the difference between coating labels and real viewing performance.
What if the highest setting still looks dim?
First, compare the optic with the conditions it was designed for. A low-light illuminated riflescope may not look like an electronic red-dot sight in noon sunlight.
If the illumination is unusually weak in appropriate conditions, check the battery orientation, battery condition, cap tightness, and clean contact surfaces according to the manufacturer’s manual. Some controls also include off positions between brightness levels, while others use push-button sequences or automatic shutoff. Do not assume a control has failed until its operating sequence has been confirmed.
Battery life is also setting-dependent in many illuminated optics: higher output usually requires more power. Exact runtime varies too much by design, battery, temperature, and electronics to infer from the number of settings alone.
The practical rule
Use illumination to separate the aiming mark from the background—not to dominate the sight picture. Start low, increase only until the reticle is easy to pick up, and check again when the light changes.
If the target remains clear and the illuminated edges stay crisp, the setting is doing its job. If the reticle grows a halo, hides detail, or becomes the brightest thing you can see, turn it down. More brightness is available for a reason, but it is not automatically more useful.
For broader comparison and setup information, browse Sporting Optics or visit our Buying Guides.

















Leave a comment