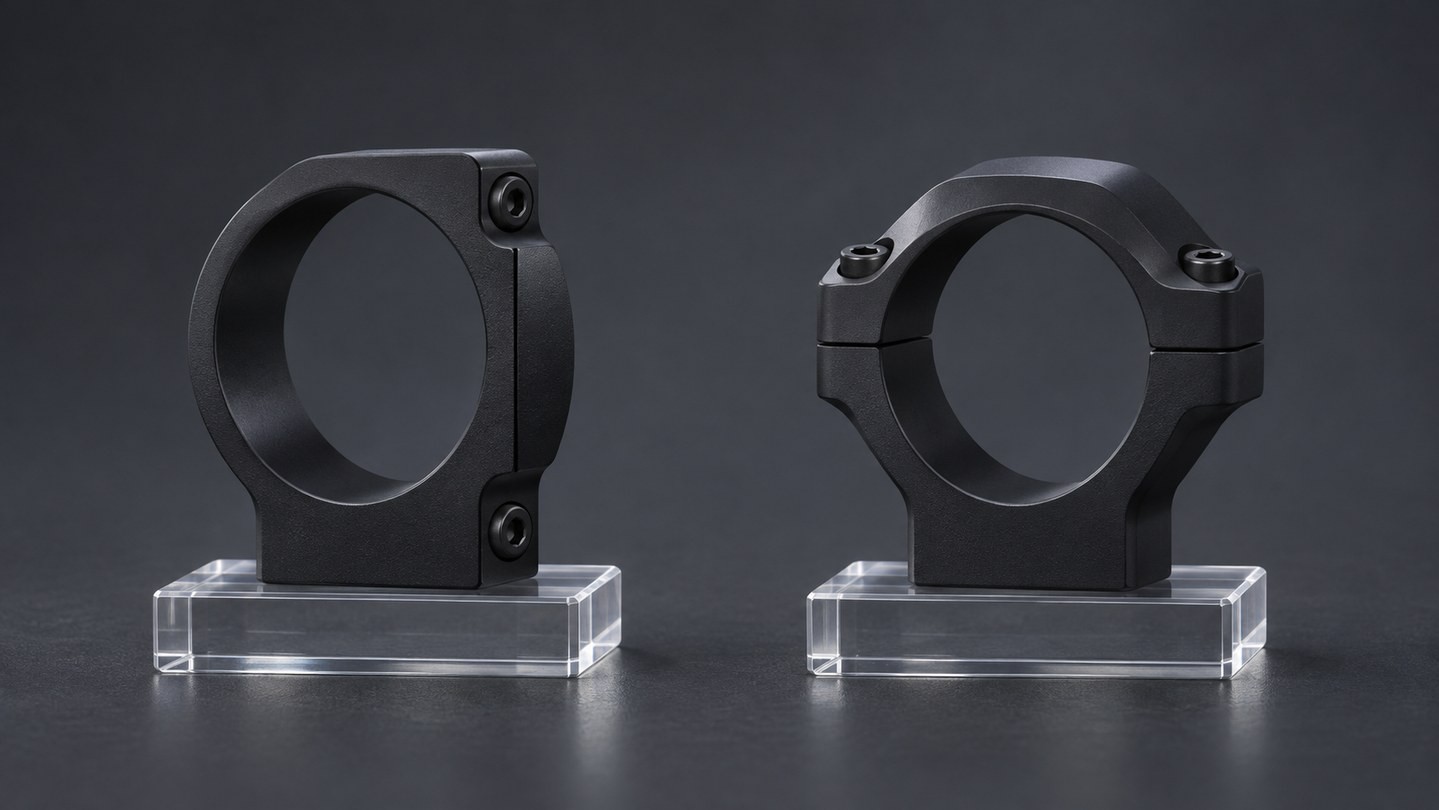
Two scope rings can fit the same tube diameter and mounting interface yet require noticeably different installation habits. The most visible difference is where each ring separates: a horizontal-split ring usually has a removable top cap, while a vertical-split ring separates along the sides of the scope tube.
Neither layout is automatically better for every setup. The useful question is how the split affects assembly order, access around the scope controls, gap inspection and the instructions you must follow. This guide explains those practical differences without turning one manufacturer’s procedure into a universal rule.
First identify the actual ring design
Do not classify a ring only by counting screws. A horizontal-split design normally has a lower cradle and a separate upper cap, with screws arranged on the left and right sides of the cap. A vertical-split design usually has two side halves, with fasteners above and below the scope tube.
There are also hybrid, hinged and proprietary systems. A one-piece mount can still use horizontally split caps, and two separate rings can use either split direction. Check the maker’s parts diagram and installation sheet before loosening anything. If you are still choosing between separate rings and an integrated mount, read our one-piece mount versus separate rings guide.
Horizontal split rings usually begin with a lower cradle
With a common horizontal-split layout, the lower ring sections are attached and aligned first. The scope can then rest in those lower halves while eye relief, rotation and control clearance are checked. The upper caps are placed loosely afterward so the tube can still move before final tightening.
This open-cradle stage can make initial positioning straightforward because the scope is supported while remaining visible. It also makes it easier to lift the scope out before final assembly. However, the cap screws still need the maker’s specified sequence and progressive tightening. An apparently simple top cap does not make uneven clamping harmless.
Vertical split rings may change the assembly order
Some vertically split rings are assembled around the scope tube before the ring is fully secured to its base. Others use a specific side-first tightening order. Vortex’s general mounting guidance notes that a vertical design may require one side to be fully tightened before moving to the other, while Warne describes a different procedure for its own vertical rings.
That is exactly why the installation sheet matters. Copying the even-gap method from a horizontal cap onto a vertical ring can be wrong for the product in front of you. If the manual is missing or ambiguous, stop and obtain the correct instructions rather than relying on a photograph of a similar ring.
The visible gap does not mean the same thing on every ring
Many horizontal-split instructions call for an even gap on both sides of the ring cap. The gap is a useful assembly reference because it shows whether the cap has been drawn down uniformly. It is not a target dimension that should be invented or forced.
A vertical-split ring may close differently at its upper and lower fasteners. The correct finished appearance can depend on the design and sequence. Never keep tightening merely to make two gaps look identical. If the specified torque or clamping sequence has been reached and the gap still looks unexpected, compare it with the product diagram or contact the manufacturer.
Control clearance can favor a slim side profile
Side focus, illumination and other controls can sit close to the rear ring. A vertical split may place its fasteners above and below the tube, leaving a slimmer side profile near those controls. Warne specifically identifies side-control clearance as one reason for its vertically split layout.
That does not guarantee clearance on every scope. Ring width, screw heads, saddle shape and ring spacing all matter. Before final tightening, rotate every nearby control through its intended range and confirm that fingers, caps and accessories have usable space. The same check applies to horizontal rings with wide caps or projecting screw heads.
Split direction does not determine the correct torque
There is no single cap-screw value for all horizontal rings, all vertical rings or all tube materials. Published instructions differ by product, fastener and thread condition. Leupold and Vortex documents provide different examples for their own systems, and those numbers should not be transferred to unrelated hardware.
Use the exact ring maker’s current instructions, the specified tool and the stated thread condition. Extra lubricant or thread locker can change the relationship between applied torque and clamping force. Our scope-mount torque guide explains why a remembered number is not a safe substitute for the product manual.
Alignment and contact still matter in both layouts
A split direction cannot correct a mismatched tube diameter, misaligned bases or damaged contact surfaces. The scope should fit the stated ring diameter, sit without being forced and retain enough straight tube area for the selected ring spacing. A tube that rocks, binds or must be pressed into place needs investigation before screws are tightened.
Keep mating surfaces clean according to the manufacturer’s directions and inspect for burrs, debris or damaged threads. Do not automatically lap, shim or modify a ring because the halves appear difficult to close. Our guide to ring alignment and over-tightening covers the warning signs and service boundaries.
Ring height and spacing remain separate decisions
Vertical versus horizontal describes how the ring opens; it does not tell you whether the ring is low, medium or high, or whether the spacing fits the available straight section of the scope tube. Objective clearance, eyepiece clearance, control access and the mounting platform still determine the usable height and position.
Measure with the actual scope and any intended lens caps rather than relying only on a product label. The scope-ring height guide explains the clearance checks, while the ring or mount fit chart should confirm diameter and interface compatibility.
Use a design-specific installation checklist
Before final assembly, confirm each of the following:
- The ring diameter matches the scope’s main tube.
- The mounting interface and crossbolt arrangement match the base.
- The split type and exact model have been identified.
- The manufacturer’s tightening order and torque values are available.
- The scope has enough straight tube area for the chosen spacing.
- Eye relief and reticle rotation can be set before final tightening.
- Turrets, side controls, caps and accessories have clearance.
- Ring gaps and fasteners match the maker’s finished-installation guidance.
After assembly, add a small removable witness mark only if the manufacturer permits it and inspect later for movement. Our scope-creep guide explains how to distinguish possible movement from assumptions based on one mark.
The practical takeaway
Horizontal-split rings often make initial positioning intuitive because the scope rests in open lower cradles before the caps are installed. Vertical-split rings can provide a slim side profile, but their assembly and tightening sequence may be less familiar. Both layouts can work well when the ring, scope tube and mounting interface are compatible.
Choose based on verified fit, control clearance, available instructions and the installation process you can complete correctly. Most importantly, do not transfer gap expectations, torque values or tightening sequences from one split style or brand to another. The correct manual for the exact ring remains the final authority.

















Leave a comment