When a red dot and backup iron sights share the same viewing window, the usual question is simple: should the irons sit in the middle, or down near the bottom?
That is the practical difference between absolute and lower-one-third co-witness. Neither arrangement makes the red dot inherently more accurate. They simply place the optic at different heights relative to the iron-sight line, which changes the sight picture and often changes how your head meets the equipment.
What Co-Witness Actually Means
Co-witness means the iron sights can still be seen and aligned through the red dot's window. The dot and the irons remain separate aiming systems. One does not need the other to work, and one should not be used as a shortcut for zeroing the other.
This distinction matters. If the dot happens to sit above the front post while the irons are aligned, that can be a useful visual reference. It is not proof that both systems share the same zero at every distance.
Absolute Co-Witness
With an absolute co-witness setup, the aligned iron sights appear roughly through the center of the red-dot window. The optic's viewing axis and the iron-sight line are close enough in height that a normal iron-sight picture occupies the middle portion of the glass.
The advantages are straightforward:
- the iron sights are easy to find through the optic;
- the visual relationship between the two systems is obvious; and
- the setup may suit a user who already has a comfortable, repeatable position behind standard-height irons.
The trade-off is a busier window. Fixed irons remain prominent, and even folded sights can take up more of the central view when raised.
Lower-One-Third Co-Witness
With a lower-one-third setup, the red dot sits higher relative to the iron-sight line. When you deliberately lower your eye to align the irons, they appear in the lower portion of the optic window. During ordinary dot use, the main viewing area is less crowded.
This arrangement often gives a slightly more upright head position, but the effect depends on the complete setup and the user. It can also require more deliberate movement to drop behind the irons.
Lower one-third does not mean that exactly one third of every window is filled by the sights. It is a practical mounting term, not a universal geometric measurement.
The Sight Picture Side by Side
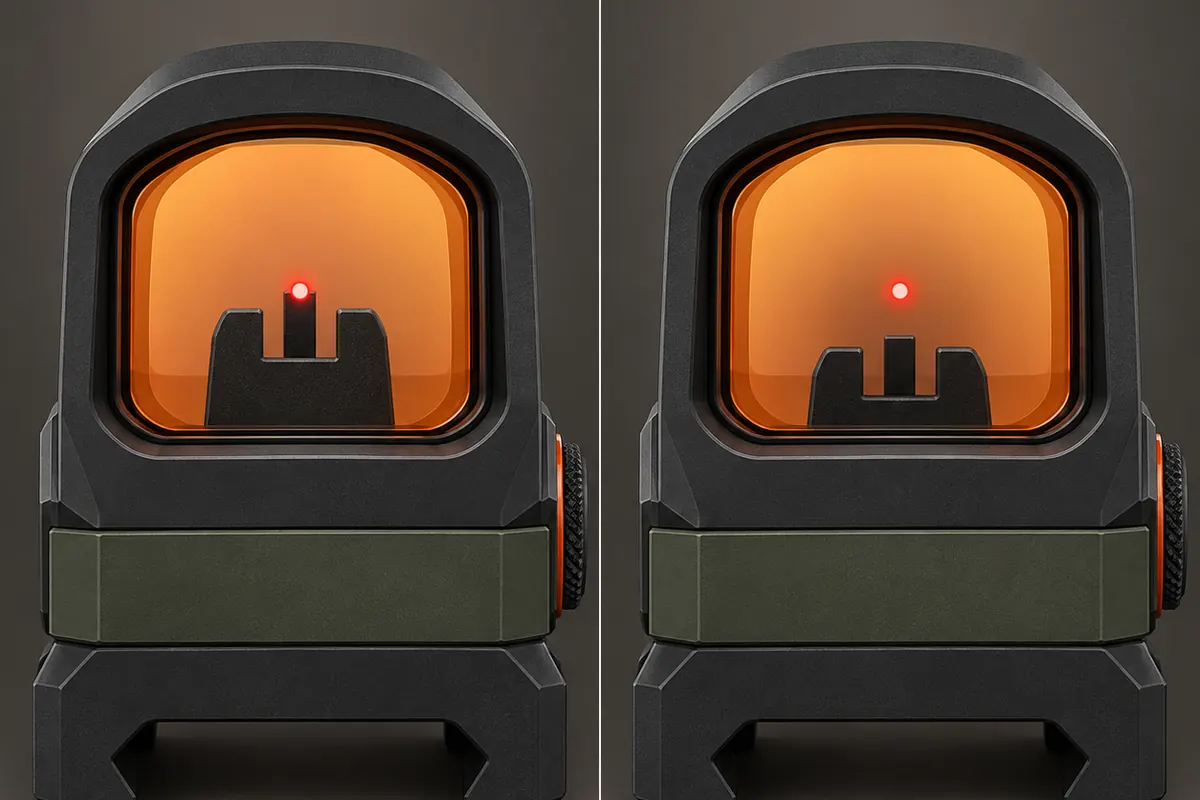 Left: absolute co-witness, with the iron-sight line near the center. Right: lower-one-third co-witness, with the irons lower in the window. This is a conceptual comparison, not a dimensional installation drawing.
The correct position is established by the mount, optic, rail and iron-sight geometry—not by dragging the dot around with its adjustment screws.
Which One Is Better?
There is no automatic winner. Absolute co-witness may feel more familiar and makes the irons immediately obvious. Lower one-third leaves a cleaner primary view and may feel more comfortable for someone who prefers a slightly higher optical axis.
Choose based on the complete system:
- your natural head position;
- whether the iron sights are fixed or folding;
- the actual optical-axis height of the sight and mount;
- whether a magnifier or other aligned optic must match that height;
- the available rail space; and
- whether the manufacturer documents compatibility with your chosen parts.
Do not buy from the label alone. Two mounts marketed with similar wording can produce different results when paired with different optic bodies or platforms.
Co-Witness Is Not the Same as Zero
The red dot and iron sights should be treated as independent systems.
Zero the irons using their normal adjustment method. Zero the red dot using its windage and elevation controls. Then confirm how they appear together. If the two references do not overlap perfectly at every distance, that does not automatically mean something is wrong; their physical heights and trajectories are not identical.
The irons can provide a useful gross check if the dot appears dramatically displaced, but they do not replace a proper zero confirmation.
Check More Than Height Before Buying
Mount height is only one part of compatibility. Also verify:
- the optic footprint or mounting interface;
- the rail or plate standard;
- screw length and specified torque;
- clearance around controls and battery access;
- magnifier centerline height, if one will be used; and
- whether the iron sights are tall enough to remain visible through the optic.
Our guide to red-dot footprints explains why a familiar-looking base is not proof of fit. If you are comparing housing styles as well, the open-versus-enclosed guide covers a separate choice that does not determine co-witness height.
A Simple Setup Check
Work with unloaded equipment in a safe area, following the instructions for the exact mount and optic.
- Confirm that the mount and sight are installed according to their manuals.
- Raise the iron sights, if they fold.
- Align the irons normally without chasing the red dot.
- Observe where the iron-sight line appears in the window.
- Return to your normal red-dot viewing position and check that the dot is easy to acquire.
- Confirm both zeros independently at the intended distance.
- Recheck the fasteners after the initial session as the manufacturer directs.
If the window position is not what the mount was supposed to provide, stop and verify the part numbers, spacers, plate and installation order. Avoid stacking improvised parts simply to move the optic a little higher or lower. Our article on why optic mounting screws loosen covers the related fastener checks.
The Practical Answer
Choose absolute co-witness when you want the irons centered and immediately present in the optic window. Choose lower one-third when you want a cleaner central view and are comfortable lowering your eye to use the backups.
Most importantly, choose by measured compatibility and a comfortable, repeatable position—not by assuming one label is universally faster, more accurate or more professional.
Explore more setup guides
Browse practical explanations of red-dot compatibility, mounting, sight pictures and optical behavior.

















Leave a comment