A red dot can have excellent battery life and still be awkward to service. The reason is simple: runtime tells you how long the sight may operate under stated conditions, while battery access tells you what must be moved, opened, or rechecked when replacement day arrives.
That difference is easy to overlook on a product page. Top-access doors, side trays, threaded side caps, and bottom-loading compartments can all work well, but they create different maintenance routines. The useful question is not which layout sounds newest. It is which layout you can service correctly on your actual setup.
Battery access is a maintenance feature
Battery location does not determine dot quality, durability, waterproofing, or runtime by itself. Those depend on the complete sight design, the specified battery, electronics, sealing, brightness use, temperature, and manufacturer test conditions.
Access layout does affect practical details:
- whether the sight must be removed from its mount;
- whether a tray, door, or cap can be reached with the sight installed;
- which small parts and seals must be inspected;
- whether mounting screws must be loosened and retightened; and
- what should be verified after the battery change.
Treat it as one line in the compatibility checklist, alongside the red dot footprint, screw requirements, mount height, and available clearance.
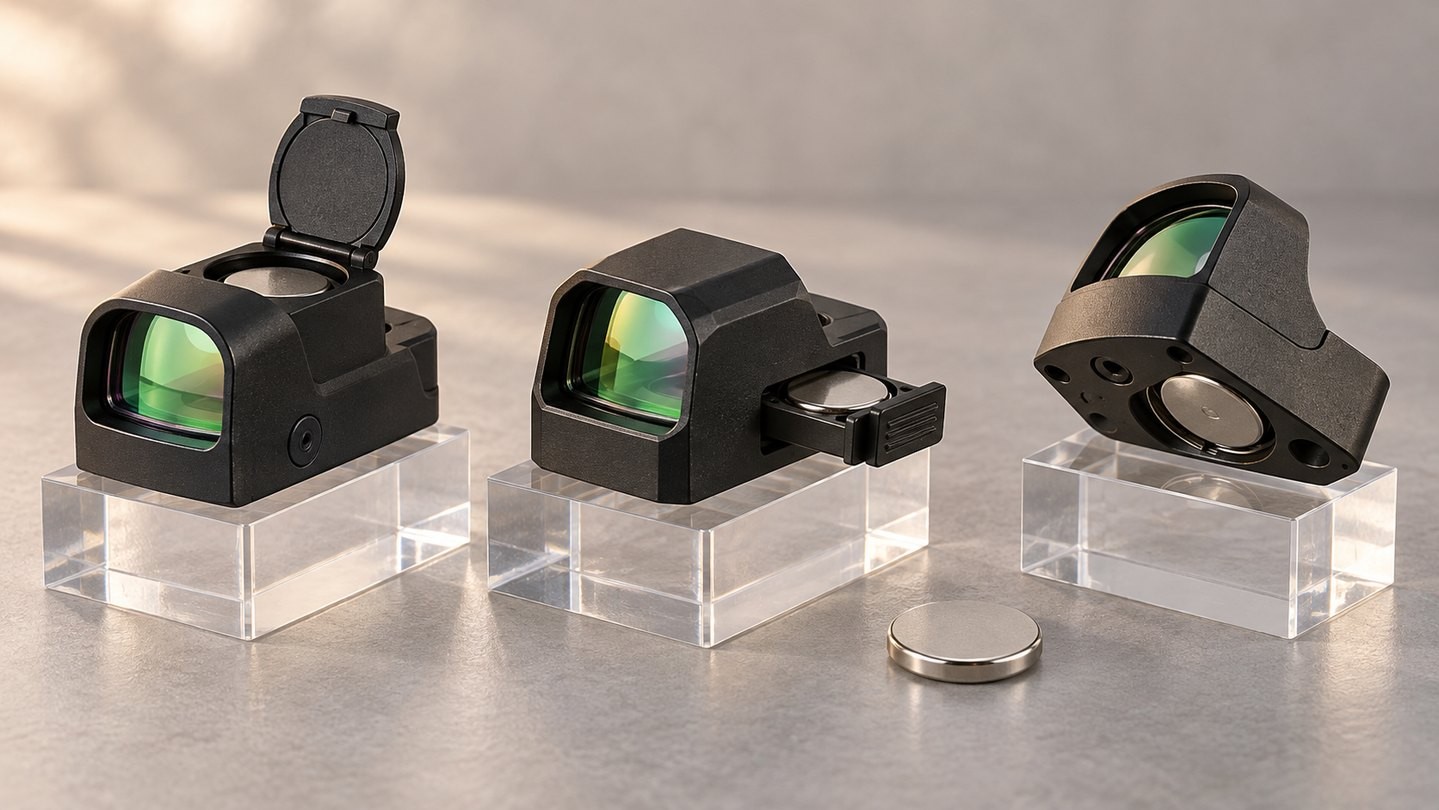
Top-access battery compartments
A top-loading design places the door above the battery. On a well-designed installation, the user can open the compartment, replace the cell, close the door, and test the sight without separating it from the mount.
That convenience is real, especially when the mounting screws are difficult to reach or use a prescribed installation sequence. It does not make the change tool-free in every model, however. One sight may use a spring-loaded latch; another may use a screw-secured cover. Follow the exact manual rather than assuming that every top door opens the same way.
Also check overhead clearance. A protective shroud, another accessory, or a cramped mounting position can obstruct a door even though the battery is technically top-accessible. Product dimensions and installation photos are more useful than the label alone.
Side trays and threaded side caps
Side access usually takes one of two forms. A thin tray slides into the housing and is retained by small screws, or a round battery sits behind a threaded cap. Both can often be serviced while the sight remains installed, provided the chosen mount leaves enough room for the tray or cap to clear.
The details matter. A tray may have a specific battery orientation and may need to sit fully flush before its fasteners are tightened. A threaded cap may rely on an O-ring and may specify a coin or tool. Cross-threading, pinching a seal, or forcing a tray can turn a convenient layout into a reliability problem.
Side access can also compete with nearby controls or accessories. Before buying, look at the side from which the tray exits, the cap diameter, and the space required to grip or turn it. “Side-loading” is not a guarantee that every installation leaves the battery reachable.
Bottom-loading battery compartments
In a bottom-loading sight, the battery sits between the sight body and its mounting surface. Replacing it normally means removing the sight from the mount or adapter plate, changing the cell, and reinstalling the sight with the correct hardware and procedure.
This layout can help keep the exterior compact and avoids a separate side tray or top door. The trade-off is maintenance time. You may need the correct driver, clean mounting surfaces, the specified screw condition, and the manufacturer’s torque instructions. A sealing plate or gasket may also be part of the assembly on some models.
Do not improvise a torque value or reuse damaged fasteners simply because the battery change seems routine. The sight manual and the mount or adapter instructions remain the controlling sources.
Does removing the sight automatically erase zero?
Not necessarily, but removal introduces variables that a top or side battery change can avoid. Dirt under the sight, a shifted adapter, inconsistent screw tension, damaged threads, or a different seating position can change the relationship between the sight and its mount.
The sensible rule is to confirm function and zero after a bottom-access battery replacement or any other removal. That is a verification step, not a claim that every properly reinstalled sight must lose zero. If a manufacturer gives a model-specific procedure, follow it.
Battery access should also be kept separate from return-to-zero claims. A sight, plate, and mount form a system; a convenient battery door does not prove mechanical repeatability, and a bottom battery does not prove poor repeatability.
Seals, caps, trays, and small screws
The battery itself is only one part of the compartment. The door, tray, cap, O-ring, gasket, contacts, and retaining screws all deserve a quick inspection.
Work in a clean, well-lit area. Check the new cell type and polarity against the manual. Keep contact surfaces free of dirt and corrosion, make sure the seal is seated correctly, and confirm that the compartment closes fully. Never force a tray, cap, or door that does not align normally.
Button and coin cells must be kept away from children, and used cells should be handled and disposed of according to local requirements. If a compartment will not close securely, stop and correct the problem before returning the sight to service.
Battery access is not battery life
An easy-access compartment does not tell you how long the cell will last. Runtime claims depend on the stated brightness setting, battery type, temperature, operating mode, and test assumptions. Motion activation, automatic brightness, and manual shutoff can change the ownership routine, but they do not make unlike runtime claims directly comparable.
Read the conditions behind the number in our guide to red dot battery-life claims. If the sight uses sleep, auto-off, or always-on behavior, review how those modes differ in the red dot power-mode guide.
A practical buying checklist
Before choosing a sight, answer these questions from the current manual or product drawing:
- What exact battery type does the model require?
- Is the compartment on the top, side, or bottom?
- Can it be opened with the sight installed on the intended mount?
- What tool, cap, tray screws, or latch does it use?
- Is an O-ring, gasket, or sealing plate part of the procedure?
- Does battery replacement require removing or loosening mounting hardware?
- What installation and zero-confirmation steps does the manufacturer specify afterward?
- Are replacement caps, trays, screws, or seals available?
These questions are more useful than treating one layout as universally superior. You can apply them while comparing the current USEEIN red dot sight range, then confirm the exact model manual before ordering.
Build the replacement routine before you need it
Record the battery model, driver size, mounting instructions, and any model-specific seal or screw requirements when the sight is first installed. Keep a fresh battery in suitable storage and schedule replacement according to the manufacturer’s guidance and your actual use.
Top and side access can reduce disturbance to the installation. Bottom access can still be entirely workable when you plan for removal, correct reinstallation, and verification. The best design is the one whose complete maintenance routine you understand and can perform without shortcuts.

















Leave a comment